EP25. Supabase Push Notification
EP24 강의에서는 Flutter앱에서 FCM Token을 얻고 Firebase 콘솔에서 푸시알림을 발송하는 테스트를 진행했습니다.
서비스 운영에서는 백앤드 로직에 의해 푸시 알림을 발송하게 됩니다.
예시)
•
매일 아침 9시 마케팅 관련 메시지
•
상품 배송 완료 알림
•
채팅메시지 수신 알림
1. 시스템 구조도
Supabase Edge Functions 백앤드 로직에서 직접적으로 Push메시지를 발송하지 않습니다. (물론 기술적으로 가능합니다만 더 나은 방법을 제시하겠습니다.)
Supabase Edge Functions에 API외 푸시 발송을 위한 Push 함수를 추가합니다.
Supabase Database에 notification 테이블을 생성하고 row가 추가되는 경우 푸시 알림이 발송되도록 trigger를 설정합니다.
2. Firebase Admin 권한 획득
Push 발송은 Firebase Admin을 이용해 진행합니다. Supabase에서 Firebase Admin기능을 사용하기 위해서는 Firebase Admin Key를 이용해야합니다.
•
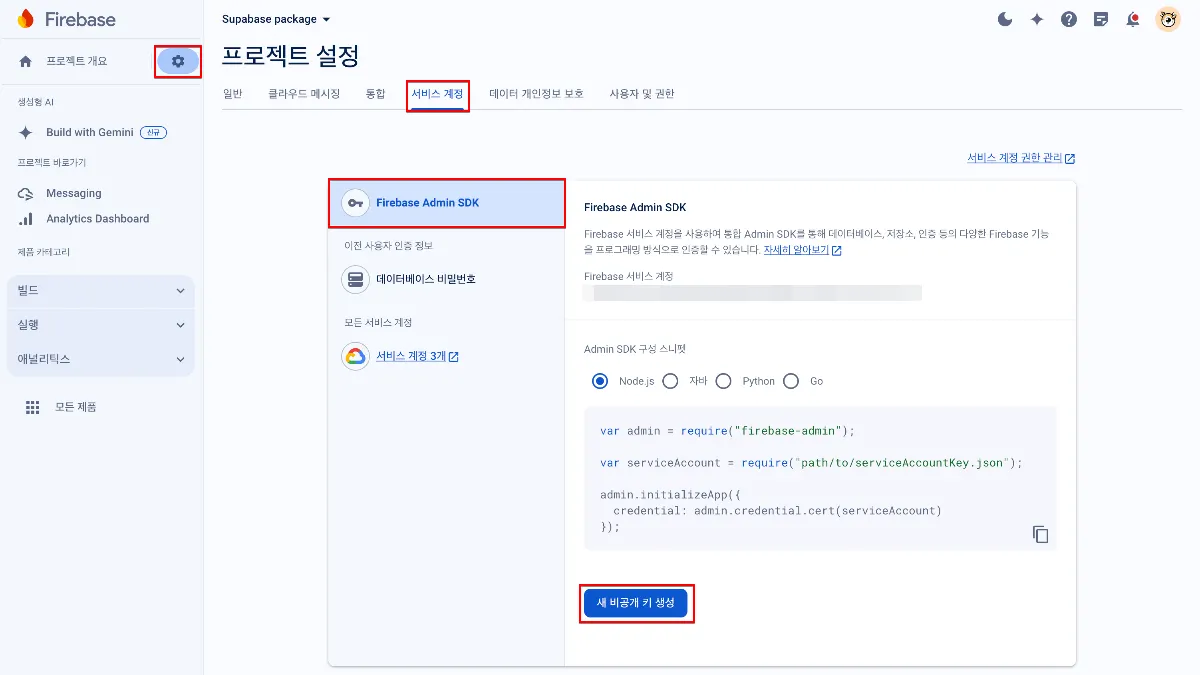
Firebase > 프로젝트 설정 > 서비스 계정 > Firebase Admin SDK
`새 비공개 키 생성`버튼으로 비공개 key 파일을 다운받습니다. Admin SDK구성 스니펫은 Node.js를 선택하면 됩니다.
•
동일한 Key는 단 1번만 다운받을 수 있으므로 안전한 곳에 저장해두시길 바랍니다.
•
이 Key는 Admin Key로 매우 강력한 권한을 행사할 수 있으므로 Public Github 등 공개된 장소에 방치되지 않도록 주의해야 합니다.
{firebase 프로젝트 관련된 이름}.json 파일이 다운로드 되며 파일을 열어보면 json 형태로 여러 key들이 저장되어 있음을 알 수 있습니다.
3. Firebase Admin Key 로컬 환경변수 설정
2번 과정에서 얻은 Firebase Admin Key를 사용해야 하지만 안전하게 관리하기 위해 환경변수로 관리합니다.
위 강의에서 supabase디렉토리 하위에 .env.production 이라는 환경변수 파일을 생성했습니다.
이 환경변수 파일에 Firebase Admin Key정보를 추가합니다.
•
FB_CLIENT_EMAIL
◦
client_email 값을 입력합니다
•
FB_PRIVATE_KEY
◦
private_key 값을 입력합니다.
◦
개행문자, “——-BEGIN PRIVATE KEY——-” prefix, “——-END PRIVATE KEY——-\n” suffix를 모두 포함하도록. 원본 그대로 입력합니다.
•
FB_PROJECT_ID
◦
project_id 값을 입력합니다.
참고) 환경변수 변경 시 supabase start 명령어로 supabase를 재시작 해야합니다.
4. 로컬 환경변수를 백앤드 로직에서 불러오는 로직 구현
supabase/functions/environments.ts 파일에 추가한 환경변수를 추가합니다.
•
supabase/functions/environments.ts
export const supabaseProjectURL = Deno.env.get(
"SB_PROJECT_URL",
)!;
export const supabaseServiceRoleKey = Deno.env.get(
"SB_SERVICE_ROLE_KEY",
)!;
export const firebaseClientEmail = Deno.env.get(
"FB_CLIENT_EMAIL",
)!;
export const firebasePrivateKey = Deno.env.get(
"FB_PRIVATE_KEY",
)!.replace(/\\n/g, "\n"); // 👈 replace 로직 추가 주의
export const firebaseProjectID = Deno.env.get(
"FB_PROJECT_ID",
)!;
TypeScript
복사
추가한 Firebase 관련 환경변수 3가지를 Deno Framework에서 사용할 수 있도록 가져옵니다.
Private Key의 경우 개행문자 처리를 위해 replace 로직이 필요함에 주의합니다.
5. Firebase Admin Key Public 환경변수 설정
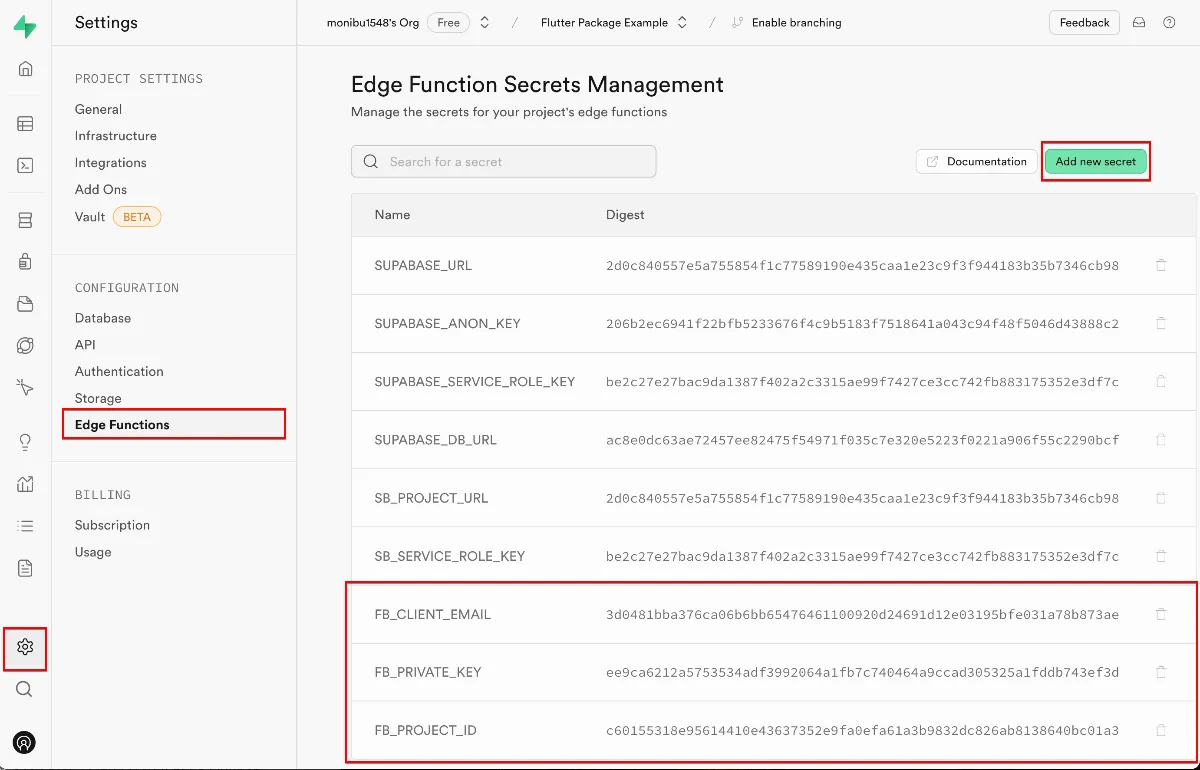
Public Supabase에서도 Firebase Admin Key를 사용할 수 있도록 환경변수를 설정합니다.
•
Supabase > Settings > Edge Functions
6. Notification 테이블 생성
Notification Trigger가 될 Database Table을 생성합니다.
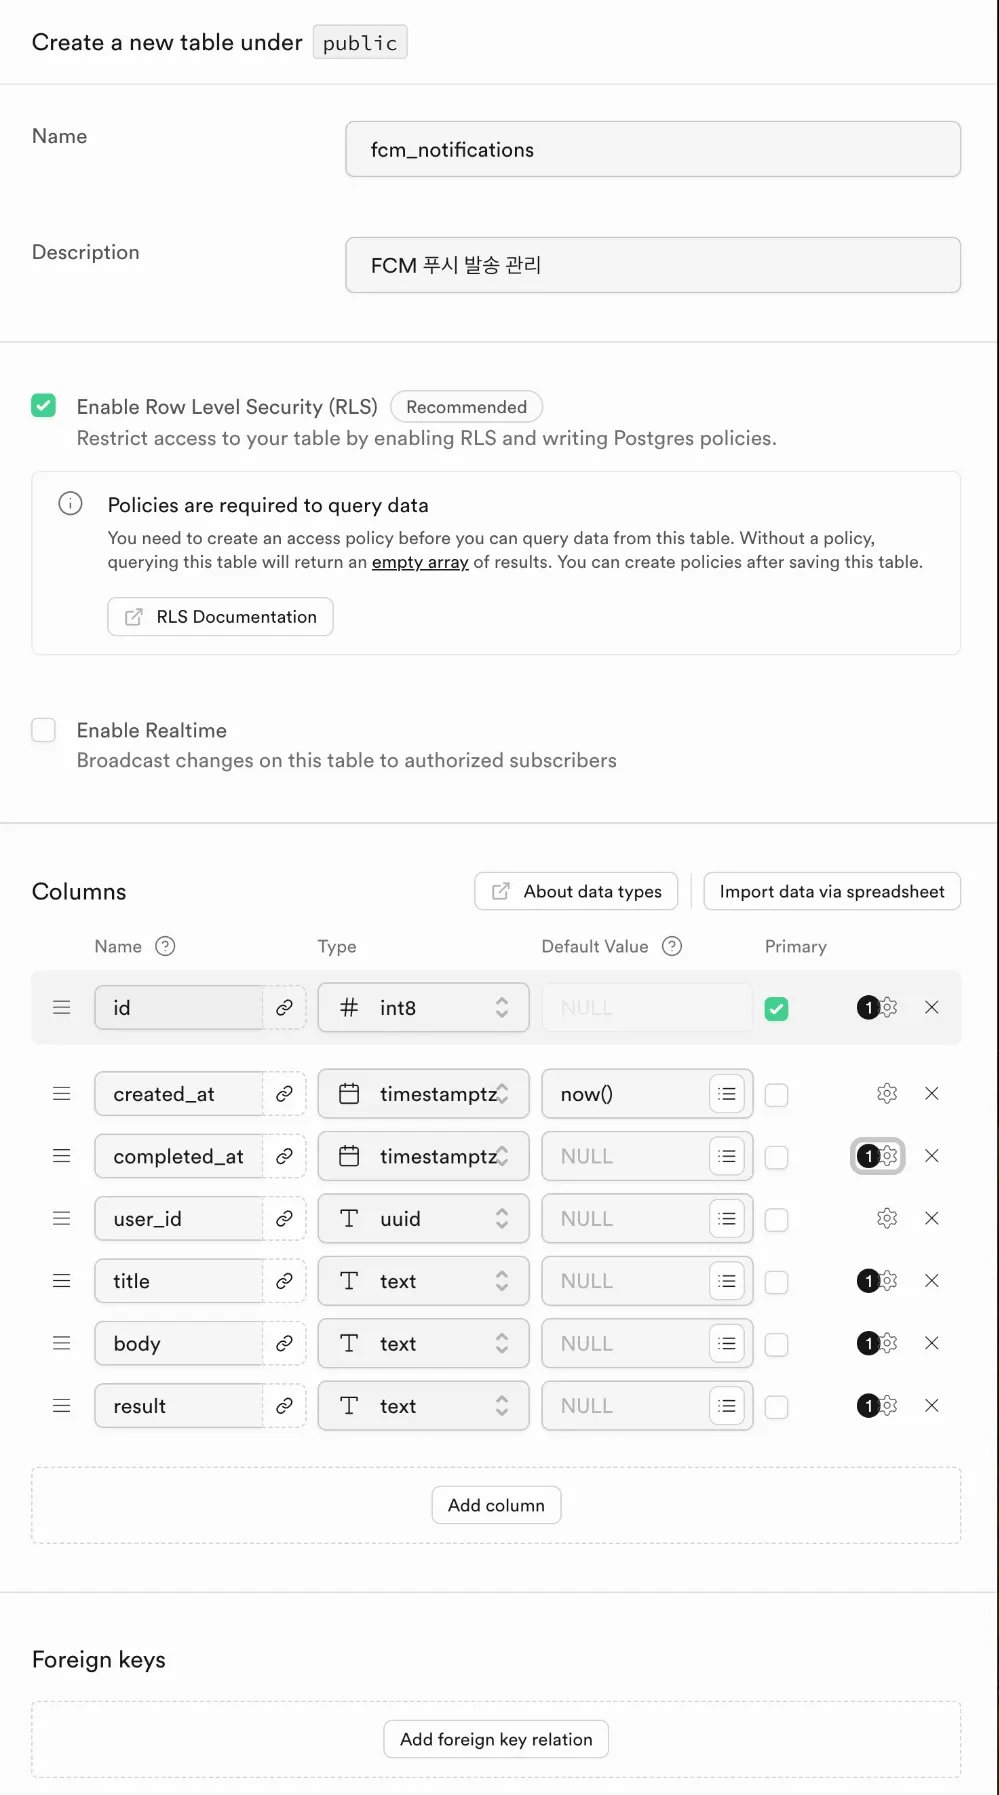
테이블의 이름은 fcm_notifications로 설정합니다. (다른이름도 가능합니다.)
Column 설명
•
id
◦
primary 값으로 auto increment로 사용합니다.
•
created_at
◦
row가 추가된 시점으로. 백앤드 로직으로부터 Push 발송 알림을 요청받은 시간이 됩니다.
•
completed_at
◦
FCM에 Push 발송 요청을 완료한 시점이 됩니다.
•
user_id
◦
push를 수신할 user의 ID 값입니다.
•
title
◦
Push Notification의 제목으로 보여질 텍스트입니다
•
body
◦
Push Notification의 본문으로 보여질 텍스트입니다
•
result
◦
FCM에 Push 발송 요청에 대한 결과를 저장합니다.
7. Push 함수 생성
supabase functions new push
Bash
복사
위 명령어로 push라는 이름의 함수를 추가합니다.
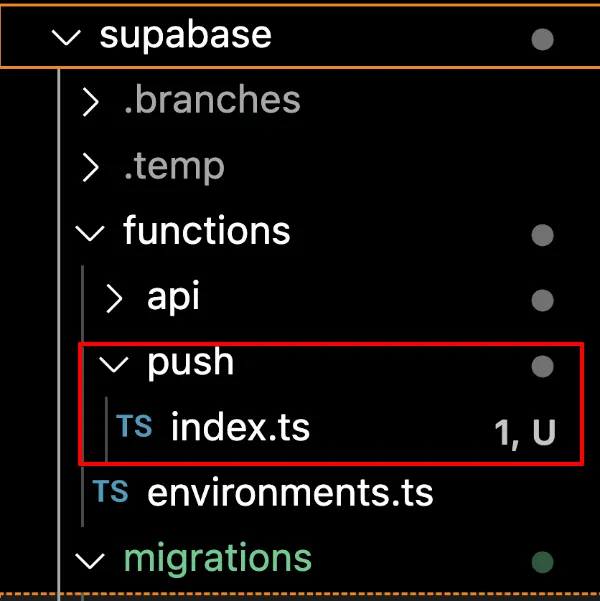
supabase/functions 하위에 push 디렉토리와 index.ts 파일이 생성됩니다.
•
supabase/functions/push/index.ts
import {
firebaseClientEmail,
firebasePrivateKey,
firebaseProjectID,
} from "../environments.ts";
import { JWT } from "npm:google-auth-library@9";
import { supabase } from "../api/lib/supabase.ts";
// fcm_notifications 테이블의 레코드를 나타내는 인터페이스
interface UserNotificationRecord {
id: string;
user_id: string;
title: string | null;
body: string | null;
}
// Webhook 페이로드를 나타내는 인터페이스
interface UserNotificationWebhookPayload {
type: "INSERT";
table: string;
record: UserNotificationRecord;
schema: "public";
}
// 캐시된 액세스 토큰 및 만료 시간
let cachedAccessToken: string | null = null;
let tokenExpirationTime: number | null = null;
// 웹훅 엔드포인트
Deno.serve(async (req) => {
const payload: UserNotificationWebhookPayload = await req.json();
// FCM 토큰 조회
const { data, error } = await supabase
.from("fcm_tokens")
.select("fcm_token")
.eq("user_id", payload.record.user_id);
const completedAt = new Date().toISOString();
// FCM 토큰이 없거나 오류가 발생한 경우 처리
if (error || !data || data.length === 0) {
console.error("Error fetching FCM tokens:", error || "No FCM tokens found");
await updateNotificationResult(
payload.record.id,
completedAt,
{ "NOT_EXIST_USER": [] },
).catch((err) =>
console.error("Error updating result for non-existent user:", err)
);
return new Response(
JSON.stringify({ error: "No FCM tokens found for the user" }),
{
headers: { "Content-Type": "application/json" },
status: 404,
},
);
}
const fcmTokens = data.map((row: { fcm_token: string }) => row.fcm_token);
try {
// FCM 알림을 보내기 위한 액세스 토큰 가져오기
const accessToken = await getAccessToken({
clientEmail: firebaseClientEmail,
privateKey: firebasePrivateKey,
});
// 각 FCM 토큰에 대해 알림 전송
const notificationPromises = fcmTokens.map((token) =>
sendNotification(token, payload.record, accessToken)
);
// 모든 알림 전송 작업 완료 대기
const results = await Promise.all(notificationPromises);
// 결과 요약
const resultSummary: { [key: string]: string[] } = { "SUCCESS": [] };
results.forEach(({ fcmToken, status }) => {
if (status === "SUCCESS") {
resultSummary["SUCCESS"].push(fcmToken);
} else {
if (!resultSummary[status]) {
resultSummary[status] = [];
}
resultSummary[status].push(fcmToken);
}
});
// 데이터베이스에 결과 업데이트
await updateNotificationResult(
payload.record.id,
completedAt,
resultSummary,
).catch((err) => console.error("Error updating notification result:", err));
return new Response(JSON.stringify({ results }), {
headers: { "Content-Type": "application/json" },
});
} catch (err) {
console.error("Error sending FCM messages:", err);
await updateNotificationResult(
payload.record.id,
completedAt,
{ "SEND_ERROR": [] },
).catch((err) =>
console.error("Error updating result for send error:", err)
);
return new Response(
JSON.stringify({ error: "Failed to send FCM messages" }),
{
headers: { "Content-Type": "application/json" },
status: 500,
},
);
}
});
// FCM 알림을 보내기 위한 액세스 토큰 가져오기
const getAccessToken = async ({
clientEmail,
privateKey,
}: {
clientEmail: string;
privateKey: string;
}): Promise<string> => {
const now = Date.now();
if (cachedAccessToken && tokenExpirationTime && now < tokenExpirationTime) {
return cachedAccessToken;
}
const jwtClient = new JWT({
email: clientEmail,
key: privateKey,
scopes: ["https://www.googleapis.com/auth/firebase.messaging"],
});
const tokens = await jwtClient.authorize();
cachedAccessToken = tokens.access_token!;
// 토큰 만료 시간 설정
tokenExpirationTime = tokens.expiry_date!;
return cachedAccessToken;
};
// 단일 FCM 토큰에 알림 전송
const sendNotification = async (
fcmToken: string,
record: UserNotificationRecord,
accessToken: string,
): Promise<{ fcmToken: string; status: string }> => {
try {
const res = await fetch(
`https://fcm.googleapis.com/v1/projects/${firebaseProjectID}/messages:send`,
{
method: "POST",
headers: {
"Content-Type": "application/json",
Authorization: `Bearer ${accessToken}`,
},
body: JSON.stringify({
message: {
token: fcmToken,
notification: {
title: record.title,
body: record.body,
},
},
}),
},
);
const resData = await res.json();
if (res.status < 200 || 299 < res.status) {
const errorCode = resData.error?.details?.[0]?.errorCode ||
resData.error?.status || "UNKNOWN_ERROR";
console.error("Error sending FCM message:", errorCode);
return { fcmToken, status: errorCode };
} else {
return { fcmToken, status: "SUCCESS" };
}
} catch (err) {
console.error("Error sending FCM message:", err);
return { fcmToken, status: "SEND_ERROR" };
}
};
// 데이터베이스에 결과 업데이트
const updateNotificationResult = async (
id: string,
completedAt: string,
result: { [key: string]: string[] },
) => {
try {
const { error } = await supabase
.from("fcm_notifications")
.update({ completed_at: completedAt, result: JSON.stringify(result) })
.eq("id", id);
if (error) {
console.error("Error updating notification result:", error);
throw error;
}
} catch (err) {
console.error("Exception updating notification result:", err);
throw err;
}
};
TypeScript
복사
8. Push 함수 배포
bash deploy.sh
TypeScript
복사
deploy 스크립트를 실행하여 push 함수를 public으로 배포합니다.
•
Supabase > Edge Functions
Edge Functions 대시보드에서 push 함수가 추가된 것을 확인할 수 있습니다.
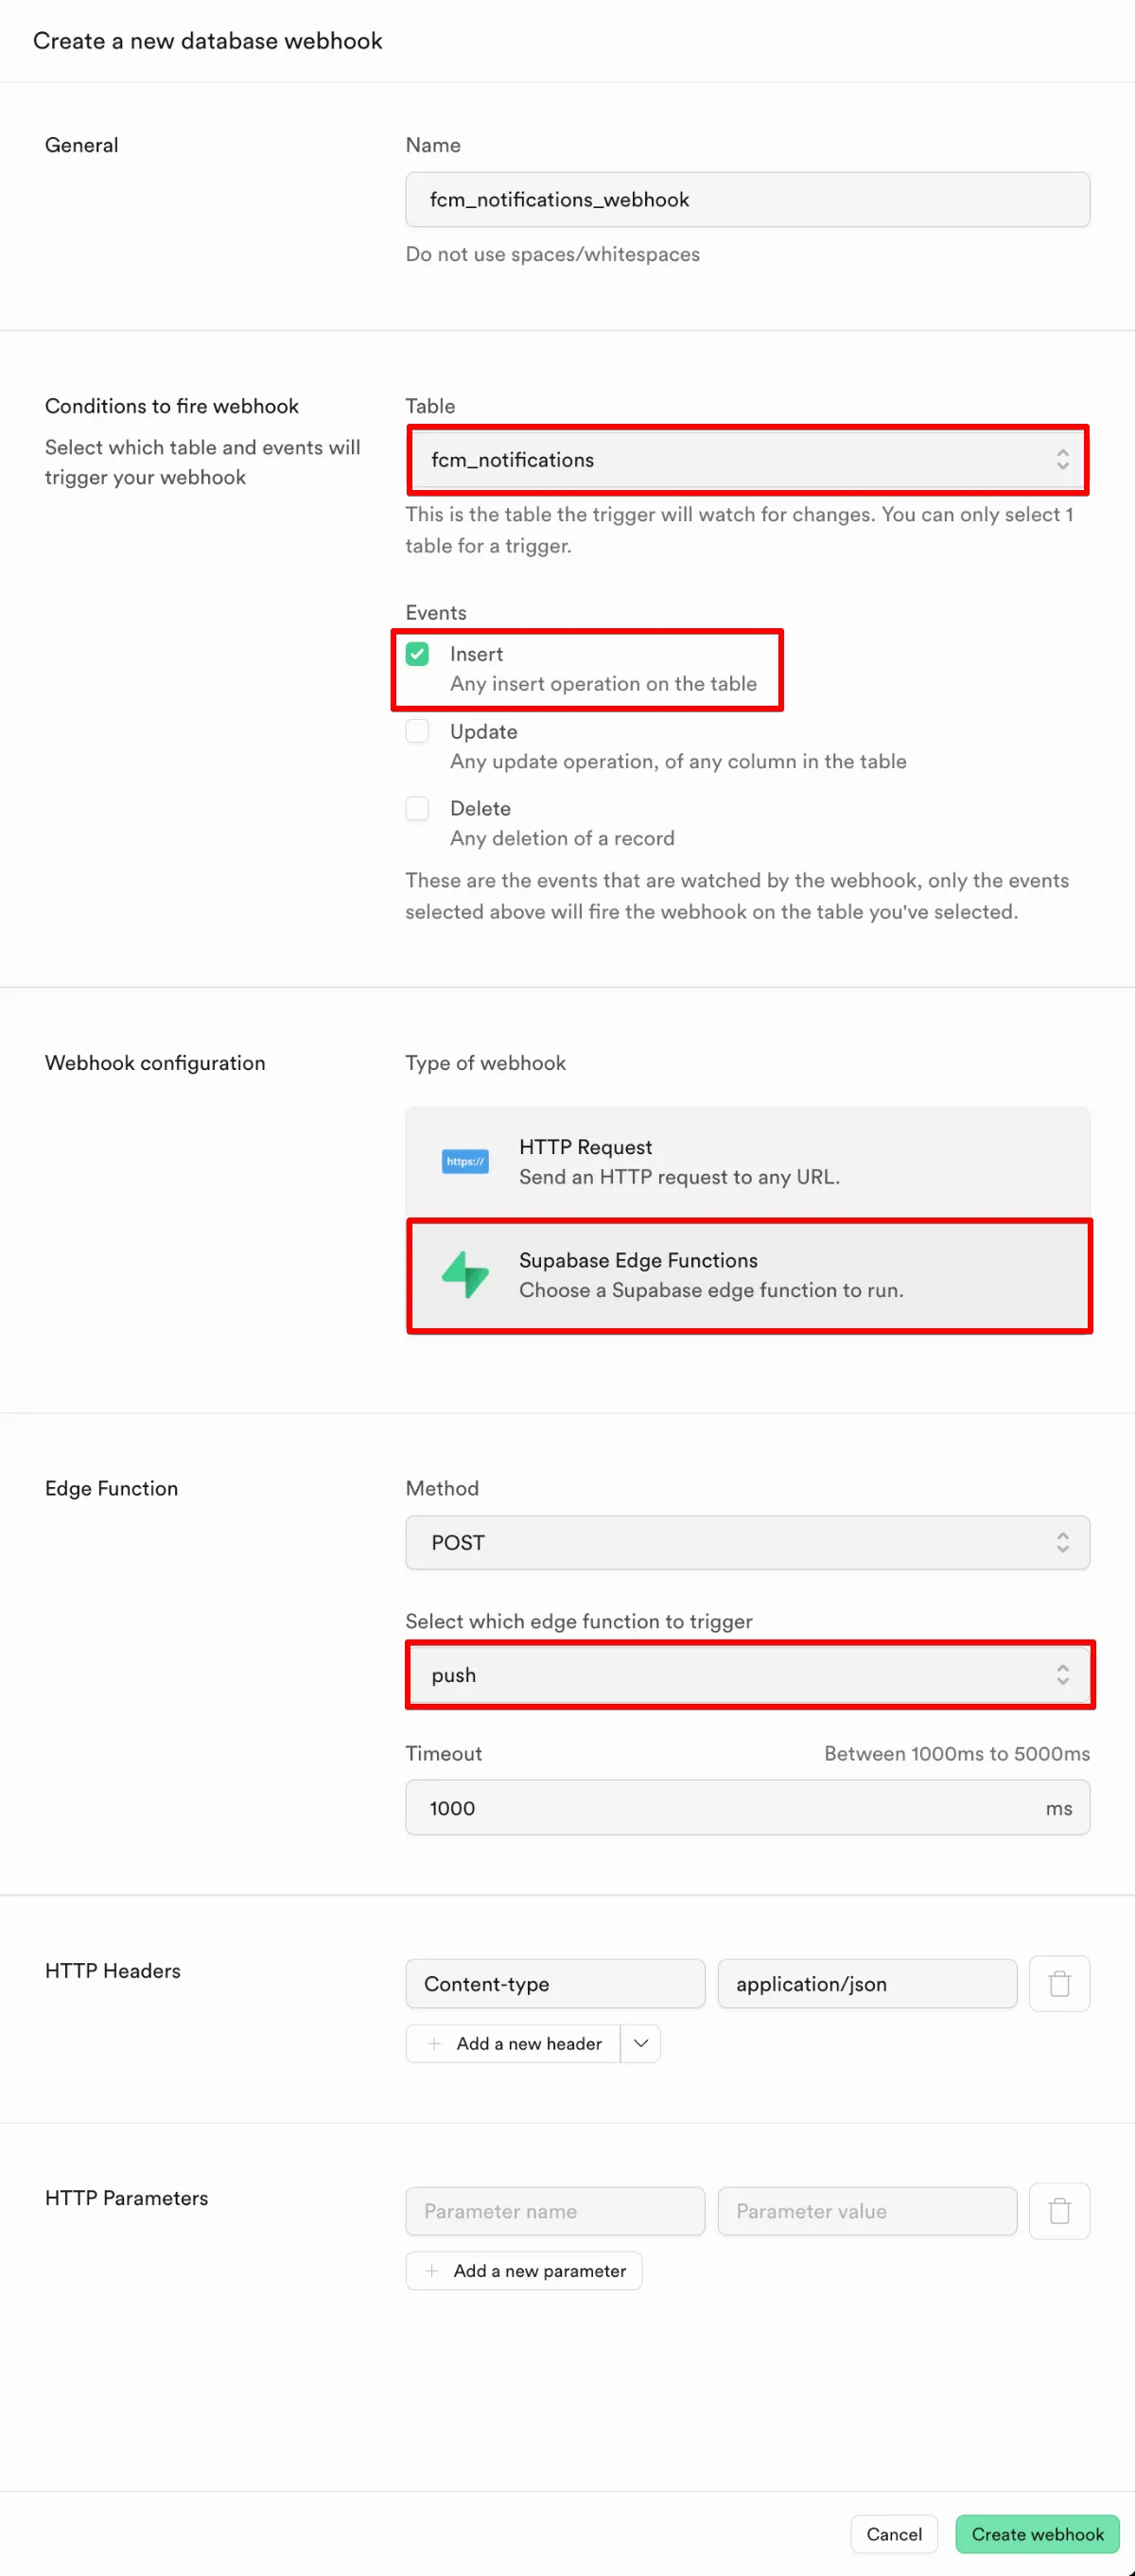
9. Supabase Database Webhook 설정
fcm_notifications 테이블에 데이터가 생성되면 Push 함수를 호출하도록 webhook을 설정합니다.
•
Supabase > Database > Webhooks
Enable Webhooks 버튼을 눌러 Webhook을 추가합니다.
•
fcm_notifications 테이블을 트리거로 사용하겠다는 선언입니다.
•
fcm_notifications 테이블에 새로운 row가 추가되는 것을 트리거로 사용하겠다는 선언입니다.
•
트리거가 되면 Supabase Edge Function을 호출하겠다는 선언입니다.
•
Edge Functions 중 push 함수를 호출하겠다는 선언입니다.
10. Supabase DB pull
Supabase콘솔에서 fcm_notifications 테이블을 생성하고 webhook을 생성했습니다.
작업 내용을 로컬에도 반영할 수 있도록 아래 명령어로 DB 변경사항을 로컬로 가져옵니다.
supabase db pull
Bash
복사
supabase/migrations 디렉토리 하위에 DB 변경사항이 파일로 생성됩니다. (상황에 따라 sql파일 갯수는 달라질 수 있습니다.)
11. Database를 활용한 Push 발송 테스트
•
supabase > database > fcm_notifications table
insert row 메뉴를 통해 데이터베이스에 Row를 추가합니다.
fcm_tokens 테이블에 등록된, fcm_token을 보유한 user_id와 푸시 알림 title, body정보를 입력하고 Save버튼으로 데이터를 저장합니다.
트리거에 의해 Push 메시지가 발송되어 디바이스에서 Push 알림 수신을 확인할 수 있습니다.
fcm_notifications 테이블에서 푸시 발송 완료 시간과 FCM token별 성공 여부 결과를 확인할 수 있습니다.
12. 백앤드 로직에서 호출할 수 있는 함수로 구현
fcm_notification 테이블에 user_id, title, body를 insert하는 함수를 만들어 백앤드 로직에서 필요할때 호출할 수 있도록 하겠습니다.
supabase/functions/push 하위에 enqueuePushNotifications.ts 파일을 추가합니다.
import { supabase } from "../api/lib/supabase.ts";
interface PushNotificationParams {
userId: string;
body?: string;
title?: string;
}
// fcm_notifications 테이블에 데이터를 추가하여 특정 유저에게 푸시 알림을 발송하도록 적재
export const enqueuePushNotification = async (
{ userId, body, title }: PushNotificationParams,
) => {
const { data, error } = await supabase
.from("fcm_notifications")
.insert([
{ user_id: userId, body: body || null, title: title || null },
]);
if (error) {
console.error("Error enqueuing push notification:", error);
throw error;
}
return data;
};
TypeScript
복사
이제 백앤드 로직에서 아래 코드처럼 푸시메시지 발송을 요청할 수 있습니다.
await enqueuePushNotification({ userId: userID, body: "푸시 메시지를 발송합니다.", })
TypeScript
복사

