EP12. API Response Format
API Response Format을 설계하고 그 이유를 학습합니다.
1. 타 서비스 API Response 훑어보기
유명 서비스들의 API Response를 살펴보며 왜 그렇게 구현했을지 고민해봅시다.
1.
네이버 웹툰
{
"code": 20002,
"message": "성공",
"result": {
"appVersion": "2.19.0",
"titleId": "793887"
}
}
JSON
복사
2.
쿠팡
{
"rCode": "RET0000",
"rMessage": "SUCCESS",
"rData": true
}
JSON
복사
3.
페이코
{
"code": 0,
"message": "success",
"result": {
"popupList": [],
"floatingPopup": null
}
}
JSON
복사
4.
배달의민족
{
"status": "SUCCESS",
"message": "성공",
"serverDatetime": "2024-06-18 22:44:12",
"data": {}
}
JSON
복사
다른 서비스 앱인데 Response Format이 비슷한 이유에 대해서 고민해봅시다.
2. 공통 Response Format 구현
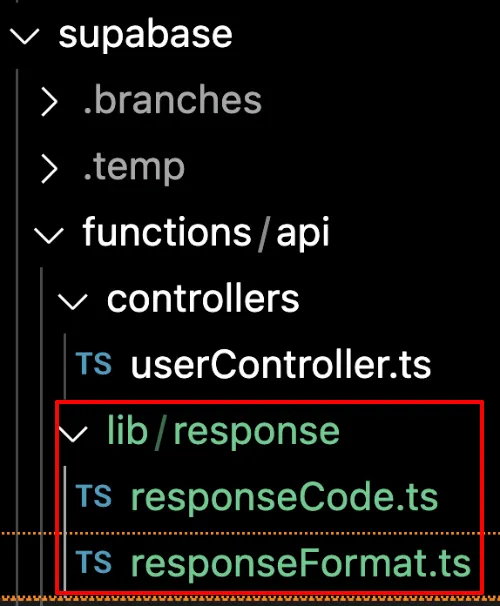
functions/api 디렉토리 하위에 lib/response 디렉토리를 추가합니다.
functions/api/lib/response/responseCode.ts
export enum ResponseCode {
SUCCESS = 10000,
INVALID_ARGUMENTS = 40000,
SERVER_ERROR = 50000,
// 서비스에 필요한 오류를 추가해서 사용합니다.
}
TypeScript
복사
•
서비스에서 발생할 수 있는 오류를 세분화하여 Code로 표현합니다.
functions/api/lib/response/responseFormat.ts
import { ResponseCode } from "./responseCode.ts";
// ResponseFormat 인터페이스는 API 응답의 형식을 정의합니다.
// 제네릭 타입 T는 JSON 객체 또는 null이어야 합니다.
// deno-lint-ignore no-explicit-any는 Record<string, any> 사용 시 lint 오류를 무시하도록 합니다.
// deno-lint-ignore no-explicit-any
export interface ResponseFormat<T extends Record<string, any> | null> {
// 응답 코드
code: ResponseCode;
// 응답 메시지
message: string;
// 응답 결과, JSON 객체 또는 null
result: T;
}
// createResponse 함수는 ResponseFormat 타입의 객체를 생성합니다.
// 제네릭 타입 T는 JSON 객체 또는 null이어야 합니다.
// deno-lint-ignore no-explicit-any는 Record<string, any> 사용 시 lint 오류를 무시하도록 합니다.
// deno-lint-ignore no-explicit-any
export function createResponse<T extends Record<string, any> | null>(
// 응답 코드
code: ResponseCode,
// 응답 메시지
message: string,
// 응답 결과, JSON 객체 또는 null
result: T,
): ResponseFormat<T> {
// ResponseFormat 객체를 반환
return { code, message, result };
}
TypeScript
복사
•
code: 요청 처리 결과 Code값
•
message: 요청 처리 결과 메시지
•
result: 요청 처리 결과 값
3. 공통 Response Format 적용
supabase/functions/api/controllers/userController.ts
+import { ResponseCode } from "./../lib/response/responseCode.ts";
import { Context } from "https://deno.land/x/hono/mod.ts";
import { UserService } from "../services/userService.ts";
+import { createResponse } from "../lib/response/responseFormat.ts";
// UserController 클래스는 FCM 토큰을 관리하기 위한 컨트롤러입니다.
export class UserController {
@@ -17,7 +19,13 @@ export class UserController {
// fcmToken이 없는 경우 에러 메시지를 반환합니다.
if (!fcmToken) {
- return c.json("Missing userID or fcmToken");
+ return c.json(
+ createResponse(
+ ResponseCode.INVALID_ARGUMENTS,
+ "Missing userID or fcmToken",
+ null,
+ ),
+ );
}
// UserService를 통해 FCM 토큰을 추가합니다.
@@ -25,7 +33,17 @@ export class UserController {
// 결과에 따라 적절한 메시지를 반환합니다.
return c.json(
- result ? "FCM token added successfully" : "Failed to add FCM token",
+ result
+ ? createResponse(
+ ResponseCode.SUCCESS,
+ "FCM token added successfully",
+ null,
+ )
+ : createResponse(
+ ResponseCode.SERVER_ERROR,
+ "Failed to add FCM token",
+ null,
+ ),
);
}
@@ -35,7 +53,9 @@ export class UserController {
const tokens = await this.userService.getFCMTokensByUserID("mock_user_id");
// 토큰 목록을 JSON 형식으로 반환합니다.
- return c.json(tokens);
+ return c.json(
+ createResponse(ResponseCode.SUCCESS, "Success", { fcmTokens: tokens }),
+ );
}
// deleteFCMTokenV1 메서드는 FCM 토큰을 삭제하는 API 엔드포인트입니다.
@@ -45,7 +65,13 @@ export class UserController {
// fcmToken이 없는 경우 에러 메시지를 반환합니다.
if (!fcmToken) {
- return c.json("Missing userID or fcmToken");
+ return c.json(
+ createResponse(
+ ResponseCode.INVALID_ARGUMENTS,
+ "Missing userID or fcmToken",
+ null,
+ ),
+ );
}
// UserService를 통해 FCM 토큰을 삭제합니다.
@@ -56,7 +82,17 @@ export class UserController {
// 결과에 따라 적절한 메시지를 반환합니다.
return c.json(
- result ? "FCM token deleted successfully" : "Failed to delete FCM token",
+ result
+ ? createResponse(
+ ResponseCode.SUCCESS,
+ "FCM token deleted successfully",
+ null,
+ )
+ : createResponse(
+ ResponseCode.SERVER_ERROR,
+ "Failed to delete FCM token",
+ null,
+ ),
);
}
}
Diff
복사
•
API Response를 생성하는 부분에서 createResponse함수를 이용해 공통 포맷으로 변경
4. 변경된 API Response 확인
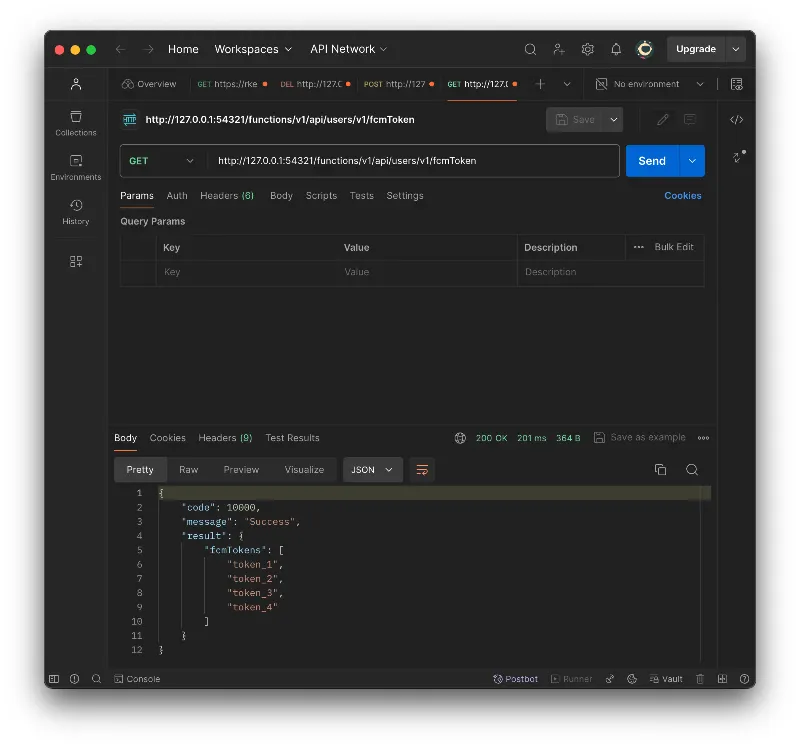
Postman을 활용해 변경된 API Response를 확인합니다.
5. Public 배포
bash deploy.sh
TypeScript
복사
public 배포 후 public API endpoint 테스트도 진행합니다.


